Authorization
Jump to: Client Credentials
Authorization code flow with proof key for code exchange (PKCE)
When public clients, e.g. native or single-page applications, request access tokens, some additional security concerns are posed that are not mitigated by the authorization code flow alone. This is because:
- Native apps
- Cannot securely store a client secret. Decompiling the app will reveal the client secret, which is bound to the app and is the same for all users and devices.
- May make use of a custom URL scheme to capture redirects, e.g. MyApp://, potentially allowing malicious applications to receive an authorization code from your authorization server.
- Single page apps
- Cannot securely store a client secret because their entire source is available to the browser.
Given this, OAuth 2.0 provides a version of the authorization code flow which makes use of a proof key for code exchange (PKCE) (defined in OAuth 2.0 RFC 7636). The PKCE-enhanced authorization code flow introduces a secret created by the calling application that can be verified by the authorization server; this secret is called the code verifier. Additionally, the calling app creates a code challenge, by hashing the code verifier, and sends this value over HTTPS to retrieve an authorization code. This way, a malicious attacker can only intercept the authorization code but they cannot exchange it for a token without the code verifier.
At a high level, the entire authorization flow for a partner application looks a like this:
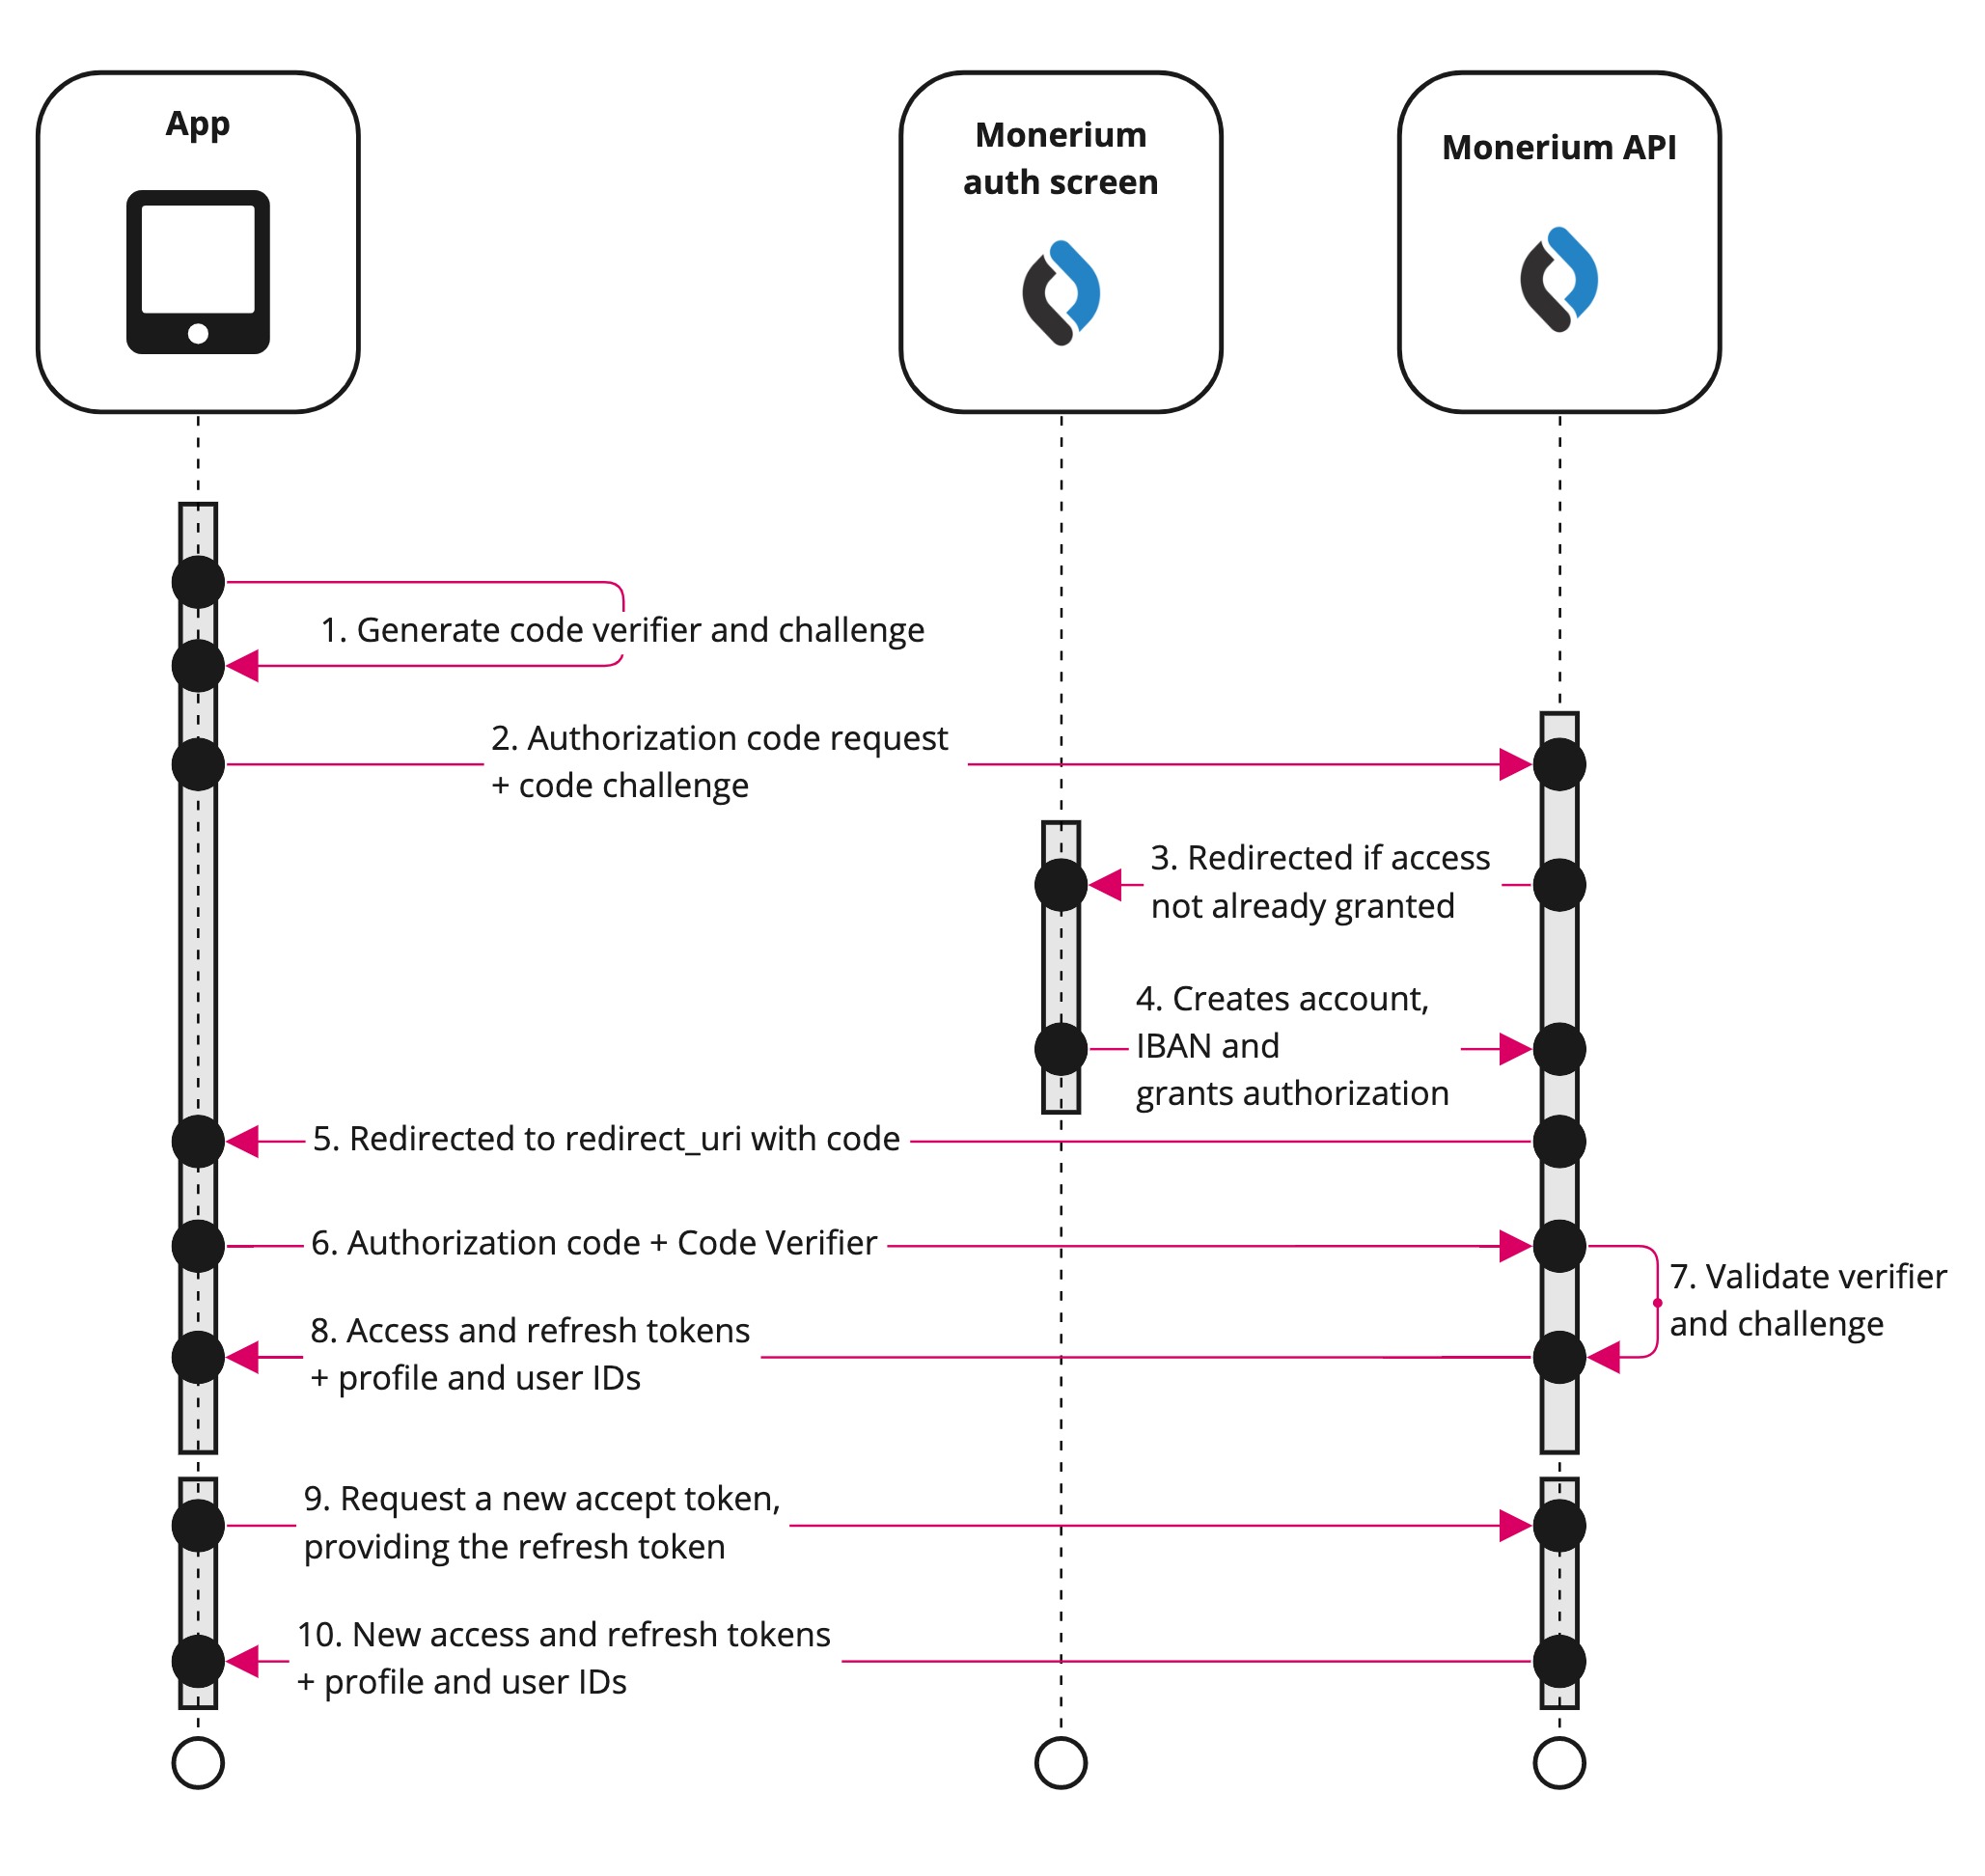
1. Generating the code challenge for PKCE in OAuth 2.0
When the user initiates an authentication flow, the client should compute a code_verifier. This must be a random, high entropy string between 43 and 128 characters. Next up, the client computes a code_challenge starting from the code_verifier (see also RFC 7636, section 4). This is the result of the following pseudo-code:
code_challenge = base64urlEncode(SHA256(ASCII(code_verifier)))
The code_challenge must be sent in the first step of the authorization flow. The code_verifier instead must be included along the initial request to the authorization server for requesting the Access Token.
2. Authorization code request query parameters
The authorization flow begins with the application directing the user to the Monerium API by either POST or GET request to the /auth endpoint, sending the code_challenge, so it can be verified later.
curl --location --request POST 'https://api.monerium.dev/auth' \
--header 'Content-Type: application/x-www-form-urlencoded' \
--data-urlencode 'client_id="your-auth-flow-client-uuid",' \
--data-urlencode 'code_challenge=${codeChallenge}' \
--data-urlencode 'code_challenge_method=S256' \
--data-urlencode 'redirect_uri=https://app.com/landingpage' \

# optional parameters to automate the wallet linking
--data-urlencode 'address=0x0000000000000000000000000000000000000000' \
--data-urlencode 'signature=0xVALID_SIGNATURE_2c23962f5a2f189b777b6ecc19a395f446c86aaf3b5d1dc0ba919ddb34372f4c9f0c8686cfc2e8266b3e4d8d1bc7bc67c34a11f9dfe8e691b' \
--data-urlencode 'chain=chaido'
A successful response will be a temporary redirect to the Monerium manage screen.
Endpoint documentation: Authorization
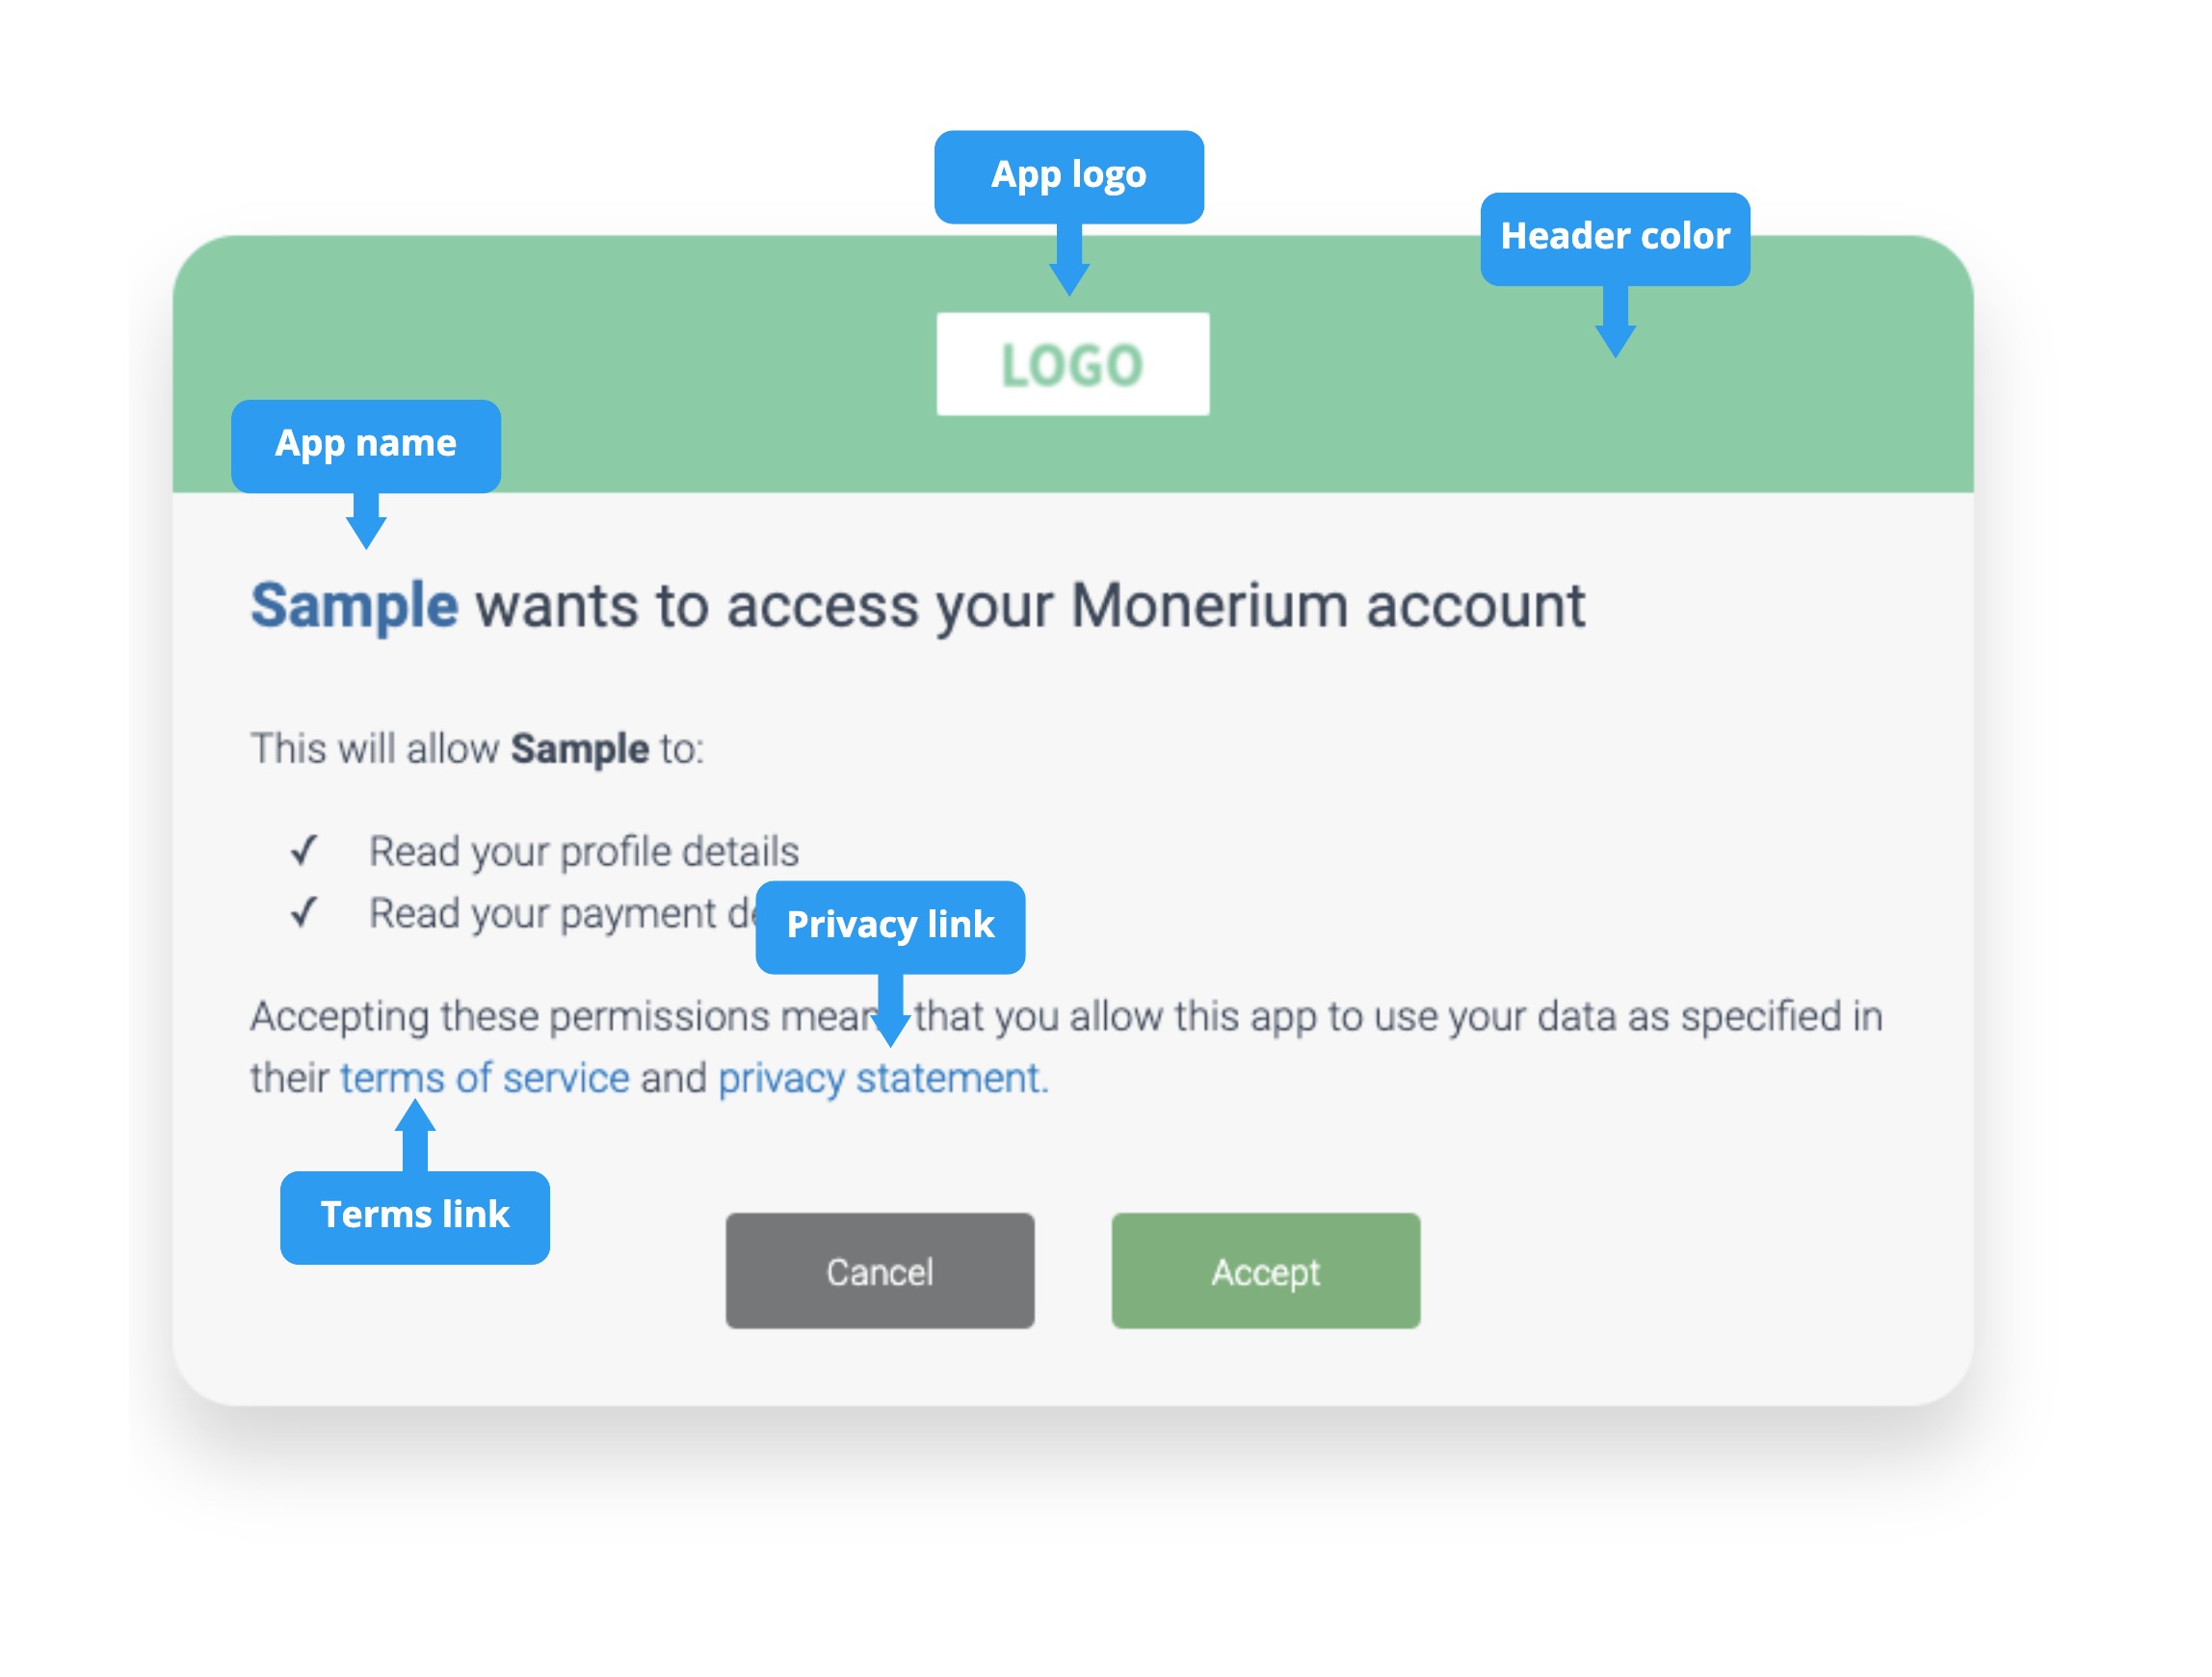
3-4. Authorization and onboarding
During the authorization flow, the users are automatically directed to a Monerium authorization screen that can be styled to fit the application. The user either authenticates with their username or passwords or signs up. After they have successfully on-boarded, they grant your application access.
Endpoint documentation: Authorization
5. Authorization response
Once the authorization is granted, users will be redirected to the redirect URL with the authorization code as a query parameter. If you include a state parameter in the initial authorization URL, it will be included in the redirect URL after the user authorizes your app.
Your app should compare the state with the state it created in the initial request. This helps ensure that you only exchange authorization codes that you requested, preventing attackers from redirecting to your callback URL with arbitrary or stolen authorization codes.
Example authorization code successful response:
HTTP/2 301
Location: https://app.com/landingpage
?code=123456789d&state=session-123
Error responses may also be sent to the redirect URL so the application can handle them appropriately:
| Error Parameter | Description |
|---|---|
error | An error code string that can be used to classify types of errors that occur, and can be used to react to errors. |
error_description | A specific error message that can help a developer identify the root cause of an authentication error. |
error_uri | A link to more detailed information about the error and how to resolve it. |
The following table describes the various error codes that can be returned in the error parameter of the error response.
| Error code | Description |
|---|---|
access_denied | Resource owner denied consent. |
invalid_request | The request is missing a required parameter, includes an invalid parameter value, or is otherwise malformed. |
unauthorized_client | The client is not authorized to request an authorization code using this method. |
unsupported_response_type | The authorization server does not support obtaining an authorization code using this method. |
server_error | The authorization server encountered an unexpected condition which prevented it from fulfilling the request. |
temporarily_unavailable | The authorization server is currently unable to handle the request due to a temporary overloading or maintenance of the server. |
6. Redeem code for access token
Having accessed the authorization code, you can now use that and a code_verifier to authenticate and redeem an access_token. Submit a POST or GET request to /auth/token with grant_type=authorization_code.
Endpoint documentation: Access Token
Example request
curl --silent --show-err --data code=xxx -d grant_type=authorization_code
-d client_id=1234 -d code_verifier=abc -d redirect_uri=http://app.com/landing
https://api.monerium.dev/auth/token
9-10. Refreshing the access token
Access tokens are short lived and you must refresh them after they expire to continue accessing resources. You can do so by submitting another POST or GET request to the /auth/token endpoint, this time providing the refresh_token instead of the code.
A refresh token is invalidated when a new access token is requested..
Endpoint documentation: Access Token
Further reading:
Client credentials authorization
The Client Credentials flow is used for server-to-server authentication where your application acts on its own behalf, not on behalf of a specific user. This is the authentication method for both Personal and White-label app types.
When to Use Client Credentials
- Personal apps: Your application performs automated actions on your own Monerium account (e.g., backend scripts, scheduled jobs, internal tooling)
- White-label apps: Your platform manages users and their payment accounts directly, with Monerium fully abstracted from end users
Client credentials (client_secret) must be stored securely and never exposed in client-side code. Only use this flow in environments where you can securely store secrets, such as backend servers.
Authentication Flow
The client credentials flow is simpler than OAuth, involving just two steps:
- Request Access Token - Exchange your credentials for an access token
- Use Access Token - Make API calls with the token
Step 1: Request an Access Token
Submit a POST request to /auth/token with your client_id and client_secret:
curl --location --request POST 'https://api.monerium.dev/auth/token' \
  --header 'Content-Type: application/x-www-form-urlencoded' \
  --data-urlencode 'client_id=1234567890abcdef' \
  --data-urlencode 'client_secret=27b871f28ab834b6be75c21578b4c944527fe34fce3952dc59f9c928b8502ee8' \
  --data-urlencode 'grant_type=client_credentials'
Successful Response:
{
  "access_token": "eyJhbGciOiJSUzI1NiIsInR5cCI6IkpXVCJ9...",
  "token_type": "Bearer",
  "expires_in": 3600,
  "refresh_token": "your-refresh-token"
}
| Field | Description |
|---|---|
access_token | The token to use for API requests |
token_type | Always "Bearer" |
expires_in | Token lifetime in seconds (typically 3600 = 1 hour) |
refresh_token | Token to request a new access token when it expires |
Error Response:
{
  "error": "invalid_client",
  "error_description": "Client authentication failed"
}
| Error Code | Description |
|---|---|
invalid_client | Invalid client_id or client_secret |
invalid_request | Missing required parameters |
unauthorized_client | Client not authorized to use this grant type |
Step 2: Use the Access Token
Include the access token in the Authorization header for all API requests:
curl --location 'https://api.monerium.dev/profiles' \
  --header 'Authorization: Bearer eyJhbGciOiJSUzI1NiIsInR5cCI6IkpXVCJ9...'
Refreshing the Access Token
When your access token expires, use the refresh token to obtain a new one without re-authenticating:
curl --location --request POST 'https://api.monerium.dev/auth/token' \
  --header 'Content-Type: application/x-www-form-urlencoded' \
  --data-urlencode 'grant_type=refresh_token' \
  --data-urlencode 'refresh_token=your-refresh-token' \
  --data-urlencode 'client_id=1234567890abcdef' \
  --data-urlencode 'client_secret=27b871f28ab834b6be75c21578b4c944527fe34fce3952dc59f9c928b8502ee8'
The response will contain a new access_token and refresh_token.
Security Best Practices
- Never commit
client_secretto version control - Store securely using environment variables or secret management services (e.g., AWS Secrets Manager, HashiCorp Vault)
- Rotate regularly - Generate new credentials periodically
- Use HTTPS only - Never send credentials over unencrypted connections
- Monitor usage - Watch for unusual API activity that might indicate compromised credentials
Complete Example
Here's a complete Node.js example:
// Store credentials in environment variables
const CLIENT_ID = process.env.MONERIUM_CLIENT_ID;
const CLIENT_SECRET = process.env.MONERIUM_CLIENT_SECRET;

async function getAccessToken() {
  const params = new URLSearchParams({
    grant_type: 'client_credentials',
    client_id: CLIENT_ID,
    client_secret: CLIENT_SECRET
  });

  const response = await fetch('https://api.monerium.dev/auth/token', {
    method: 'POST',
    headers: { 'Content-Type': 'application/x-www-form-urlencoded' },
    body: params
  });

  if (!response.ok) {
    const error = await response.json();
    throw new Error(`Authentication failed: ${error.error_description}`);
  }

  const { access_token, expires_in, refresh_token } = await response.json();
  return { access_token, expires_in, refresh_token };
}

async function makeApiRequest(accessToken) {
  const response = await fetch('https://api.monerium.dev/profiles', {
    headers: { 'Authorization': `Bearer ${accessToken}` }
  });

  return response.json();
}

// Usage
const { access_token } = await getAccessToken();
const profiles = await makeApiRequest(access_token);
console.log(profiles);
Endpoint documentation: Access Token
Further reading: